Overview
SLURM
Slurm (Simple Linux Utility for Resource Management) is a workload manager for Linux clusters that handles job scheduling and resource allocation in high-performance computing (HPC) environments. It enables efficient distribution and management of computing tasks across multiple nodes. Key components include slurmdbd (central database), slurmctld (central controller) and slurmd (compute node daemon). The cluster can be used with user commands like sbatch, srun, and squeue. The system manages batch jobs and schedules them based on resource availability, priority vector and fair share configurations.
As a cluster workload manager, Slurm has three key functions:
- First, it allocates exclusive or non-exclusive access to resources (compute nodes) to users for some duration of time.
- Second, it provides a framework for starting, executing, and monitoring work (for example, a parallel job) on the set of allocated nodes.
- Finally, it arbitrates contention for resources by managing a queue of pending work.
The reference architecture provides a Slurm cluster (version 24.05.3). It contains a Slurm controller node (master) and Slurm compute nodes (worker). In order to provide a fair share of compute and storage resources inside a multi-user environment, a quota configuration was introduced (for more detailed description, please check the multi-user environment part of the documentation).
Topology
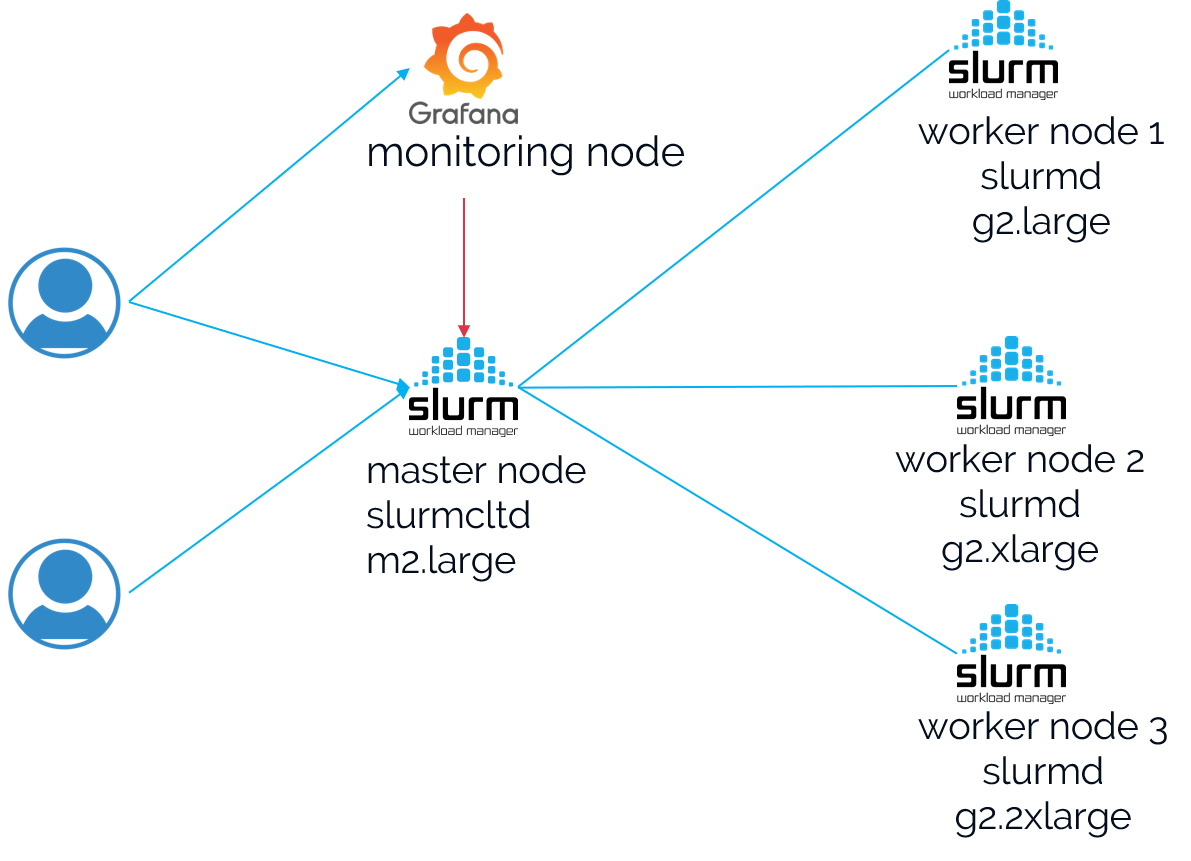
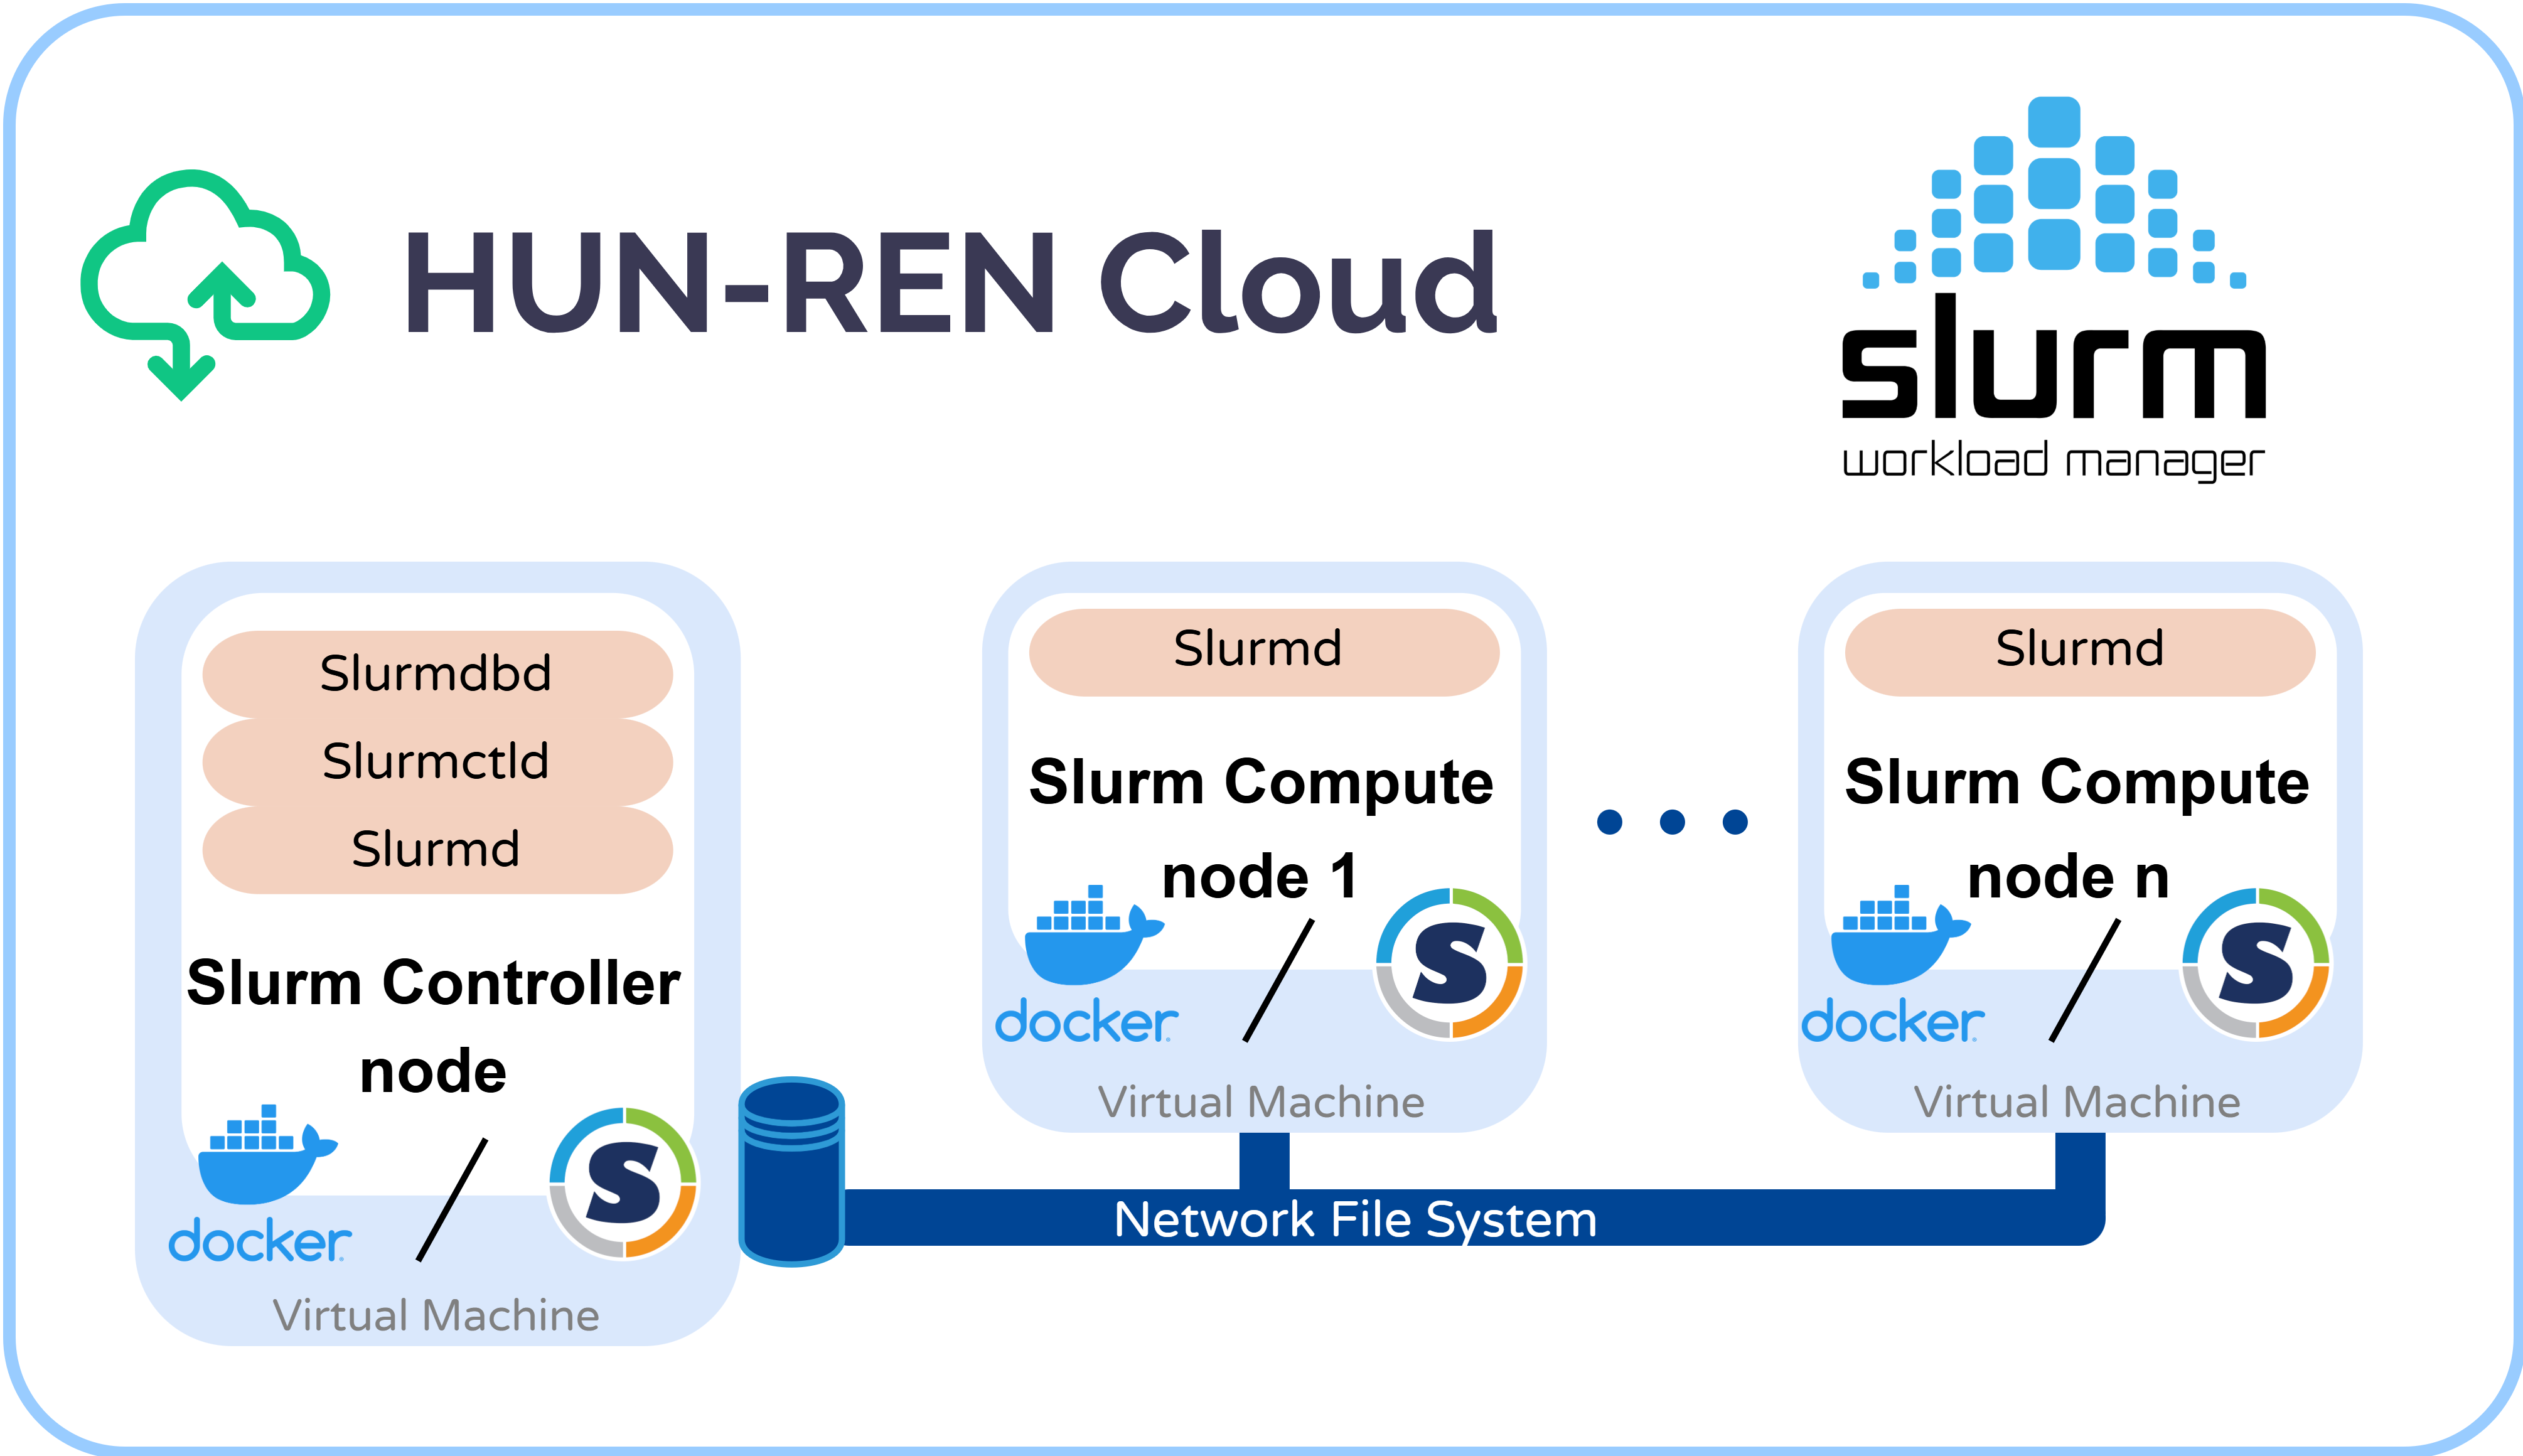 The infrastructure can be accessed via SSH. The user only interacts with the controller (master) node. Once the job is sent to the cluster with the
 sbatch command, the slurmctld service is responsible for scheduling jobs for any available compute (worker) node that fits the resource requirements. The results are stored on an external storage device, accessible by the compute nodes through an NFS mount configuration.
The shared file storage (NFS) can be accessed through the /storage path.
Slurm partitions
Inside the cluster there are multiple partitions. Each partition consists of different worker nodes with different computational resources, resource limitations and quotas. After using the sinfo command, the user can see all available partitions. To access the required partition, for example the one with allocated GPU resources, use the sbatch command with the -p flag. Otherwise the default partition will be used, marked with a * sign. For more information please visit the List of useful Slurm commands section. The list of available partitions are the following:
-
the
batch_cpu_m2.largepartition can be used for execute multiple job steps- provides access to m2.large instances, no GPU support
-
the
interactive_cpu_m2.largepartition can be used to launch a development environment (for example: Jupyterlab)- provides access to m2.large instances, no GPU support
-
the
batch_gpu_g2.large_8partition can be used for execute multiple job steps using GPU resources- provides access to g2.large instances
-
the
interactive_gpu_g2.large_8partition can be used to launch a development environment (for example: Jupyterlab), using GPU resources -
provides access to g2.xlarge instances
-
the
batch_gpu_large_g2.xlarge_16partition can be used for computationally extremely heavy job step execution using GPU resources- provides access to g2.xlarge instances
-
the
batch_gpu_large_g2.2xlarge_32partition can also be used for computationally extremely heavy job step execution using GPU resources- provides access to g2.2xlarge instances
The users access the computation results via a mounted NFS server, where the users can only access (read write and modify) their own folders.
Depending on the chosen partition (at each job), the users can access multiple compute node instances (and GPU resources):
| Instance Type | Count | VCPU | RAM | GPU RAM |
|---|---|---|---|---|
| m2.large | 4 | 4 | 8 GB | - |
| g2.large | 10 | 4 | 16 GB | 8 GB |
| g2.xlarge | 4 | 8 | 32 GB | 16 GB |
| g2.2xlarge | 2 | 16 | 64 GB | 32 GB |

How to acquire a Slurm user?
In order to get access to the Slurm cluster, proceeding with the registration is necessary.
How to access the Slurm cluster?
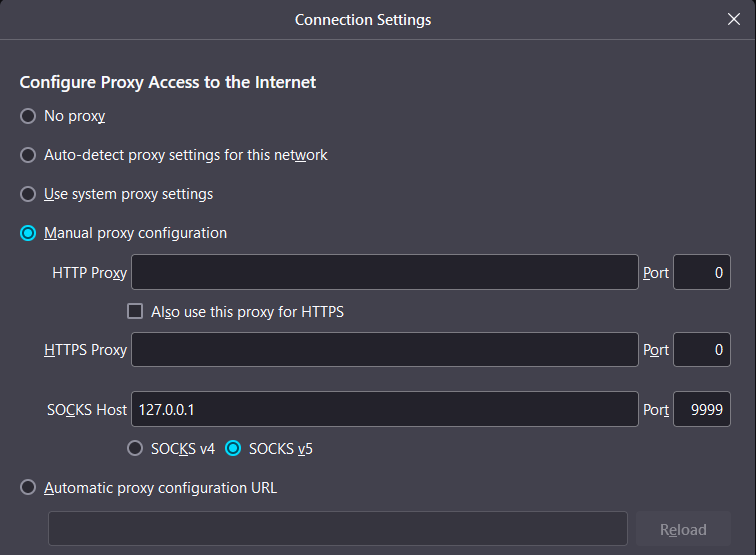
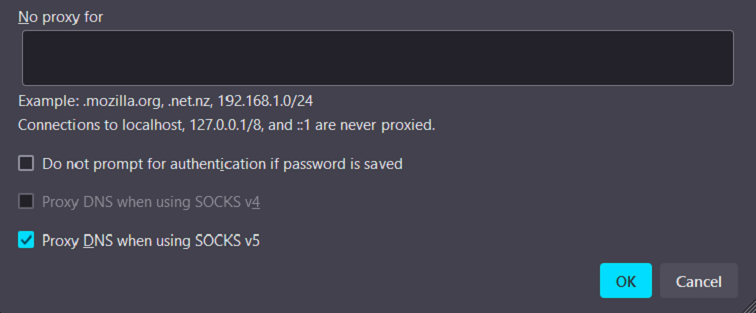
After the registration process, a username and a private SSH key will be granted to each user for initiating SSH sessions. For file transfers, SCP and WinSCP solutions are recommended. Optionally, the user can access the private network in which the Slurm cluster is running. This option might be important after scheduling an interactive job, where the user needs to access the development or configuration environment through the web. We recommend utilizing a proxy option in the SSH session initiation with the -D flag. The SSH parameters should be used the following way: ssh <username>@<domain of the master node> -D <freely chosen custom port number, this flag is optional>. For example:
 To query the job id, either use the
 sacct or the squeue command.
To query the private IP of the compute node on which the interactive job is running, use the scontrol command with the following parameters:
scontrol getaddrs $(scontrol show job 10 | grep "NodeList=slurm" | cut -d '=' -f 2) | col2 | cut -d ':' -f 1
In ths example command, the job id is 10. For more details, please visit the List of useful Slurm commands section below.
Copying folders and files
Note: It is strongly recommended to always initiate job scheduling tasks from one's home folder.
To copy any image file or code to your own folder, use the following code as an example:
# Navigate to home folder
cd ~
# Check current directory path
pwd
# Copy singularity images or any other file to the home folder with either of these commands
$ cp /storage/shared_singularity_images/pytorch.sif ~

# During copy operation, Will display the progress of a file copy operation
$ pv /storage/shared_singularity_images/tensorflow.sif > ~/tensorflow.sif
# upload files with SCP (from home folder to home folder)
$ scp -i SSH_KEY ~/SrcFile username@slurm.science-cloud.hu:DstFile

# download files with SCP (from home folder to home folder)
$ scp -i SSH_KEY username@slurm.science-cloud.hu:/storage/username/SrcFile ~/DstFile

# download folders with SCP (from home folder to home folder)
$ scp -r -i SSH_KEY username@slurm.science-cloud.hu:/storage/username/SrFcolder ~/DstFolder

# upload folders with rsync (from home folder to home folder)
rsync -a -e "ssh -i ./OpenStack" SrFcolder username@slurm.science-cloud.hu:/storage/username

# download folders with rsync (from home folder to home folder)
rsync -a -e "ssh -i ./OpenStack" username@slurm.science-cloud.hu:/storage/username/SrFcolder ~/DstFolder
Job scheduling - first steps
The overall state of the cluster can be queried with the sinfo command.
Slurm is using batch files to execute a single srun command (job step) or multiple srun commands inside one batch file. The .batch file consists of two main parts. The #SBATCH parameters and the srun commands. Generally speaking, to schedule a job against the Slurm cluster, the steps are the following:
- Creating a .batch file ~ job (with any text editor)
- Defining #SBATCH parameters
- Defining the parameters to be executed
- Shell command
- Shell script
- Code (Python, C++ etc)
- Submitting the job
- Querying results
Slurm BATCH parameters
The order and composition of the #SBATCH parameters is flexible, there are no strict rules. However, the parameter values must be in sync with the quota and partition resource limitations. For more information please visit the Slurm partitions section.
The most important #SBATCH parameters are the following:
-
General
#SBATCH --job-name=example_job# Job name#SBATCH --output=example_job.out# Output file name#SBATCH --error=example_job.err# Error file name
-
Memory
#SBATCH --mem=8G# 8GB memory per node#SBATCH –mem-per-task=4# 4GB memory per task (srunjob step)#SBATCH --mem-per-cpu=4G# 4GB memory per CPU core execution
-
CPU
#SBATCH --nodes=2# Number of nodes that should be used for job#SBATCH --ntasks=2# Number of tasks#SBATCH --ntasks-per-node=1# Number of tasks per node#SBATCH --cpus-per-task=1# Number of CPU cores per task
-
GPU
#SBATCH --gres=gpu:nvidia:1#Enforces GPU utilization during job execution.
-
Time
#SBATCH --time=00:05:00# Time limit hrs:min:sec Note: In order to use GPUs, the#SBATCH --gres=gpu:nvidia:1parameter must be used inside the batch file. The current configuration is 1 GPU : 1 Slurm node. The GPU performance is determined by the flavor of the worker node. For more information please visit the Slurm partitions section.
Note: Some #SBATCH parameters can be used for acquiring memory and CPU resources, as shown in the example. However, these resources cannot be acquired if they exceed the resource limitations defined by global QoS (quality of service) policy. For more information, please visit the documentation regarding the multi-user environment.
Note: For parallel code execution among nodes, the integrated MPI library should be used.
Note: If the #SBATCH --output=example_job.out output name is not changed for the same job (neither the path where the given job is being scheduled), the execution of the same .batch will overwrite the previous outputs. To avoid this scenario, use the _%j syntax for .out and .err files. This configuration will concat the the error and output file names with the current job ID.
You can use the following test job:
#!/bin/bash
#SBATCH --job-name=test_job              # Job name
#SBATCH --output=test_job_%j.out         # Output file name
#SBATCH --error=example_job_%j.err       # Error file name
#SBATCH --time=00:05:00                  # Time limit hrs:min:sec

echo "Hello  World"
srun hostname
pwd
sbatch test_job.batch  # send job against the scheduler
watch squeue           # check job status (pending, running, etc)
sacct                  # check if if job is completed successfully
cat test_job_150.out   # write output to console (job with 150 job ID)
Once you send in the the job, the job status can be queried with the squeue and watch sacct or sacct commands.
One job can be in the following states:
- RUNNING (R) - Job is currently running
- COMPLETED (CD) - Job has completed successfully
- PENDING (PD) - Job is waiting for resources
- SUSPENDED (S) - Job has been suspended
- CANCELLED (CA) - Job was cancelled by user or admin
- FAILED (F) - Job terminated with non-zero exit code
- TIMEOUT (TO) - Job reached its time limit
After a successful execution, the batch output should look similar to this:
If you need additional help with setting up the #SBATCH parameters, please visit this site.Slurm node states
Depending on their resource utilization and configuration, the worker nodes can be in different states:
- IDLE: The node is not allocated to any jobs and is available for use
- ALLOC: The node is allocated to one or more jobs
- MIXED: The node has some of its CPUs allocated while others are idle
- DRAIN: The node is not accepting new jobs, but currently running jobs will complete
- DRAINED: The node has completed draining and all jobs have completed
- DOWN: The node is unavailable for use
- UNKNOWN: The node's state is unknown
Job steps / Parameter sweep
A parameter sweep is a computational technique where the same job is executed multiple times with systematic variations of input parameters to explore the parameter space. In Slurm, this is often implemented using job steps, where each step processes a different combination of parameters, allowing for efficient parallel exploration. Job steps refer to the individual computational tasks within a Slurm job that can be independently tracked and managed. Parameter sweeps are particularly valuable for optimization problems, sensitivity analysis, and model calibration where understanding how parameter changes affect outcomes is crucial. This approach helps researchers discover optimal parameter configurations without manually running numerous individual jobs.
In this job step example 8 different datasets are required to be processed. For the calculations, we use 4 different worker nodes, each processing 2 datasets.
#!/bin/bash
#SBATCH --job-name=steps_job              # Job name
#SBATCH --output=steps_%j.out             # Output file name
#SBATCH --error=steps_%j.err              # Error file name
#SBATCH --time=01:00:00                   # Time limit: 1 hour
#SBATCH --mem=4G                          # Memory per node
#SBATCH --cpus-per-task=1                 # CPU cores per task
#SBATCH --nodes=4                         # Request 4 nodes
#SBATCH --ntasks-per-node=2               # Allow 2 tasks per node (we have 8 tasks total)
#SBATCH --partition=batch_gpu_g2.large_8  # GPU partition
#SBATCH --gres=gpu:nvidia:1               # GPU requirement per task

echo "Starting distributed job steps processing..."

# Get the node list and convert it to an array
NODELIST=($(scontrol show hostname $SLURM_JOB_NODELIST))
NUM_NODES=${#NODELIST[@]}

# Process each file as a separate job step
for i in {1..8}; do
    # Use a specific node from our allocation for each task
    NODE_INDEX=$((i-1))
    NODE=${NODELIST[$NODE_INDEX]}

    echo "Starting step for file $i on node $NODE"
    # Run as a job step with srun, specifically on the selected node
    srun --nodes=1 \
         --nodelist=$NODE \
         --output=step_${i}_%j.out \
         --error=step_${i}_%j.err \
         /bin/bash -c
Notes regarding job steps and parameter sweep: * Multiple srun commands (job steps) in a single .batch task * Srun commands embedded in a for loop * Sequentially running srun commands * Number of executed srun commands → no limit * Potential resource limitation: if the running time of the srun commands exceeds the time limit, the task enters CANCELED status
Further example codes and .batch files are available under /storage/shared_batch_examples and /storage/shared_code_examples directories. The files can be edited after copying them to the user home folder with the cp /storage/shared_code_examples/<random code example> ~ command. The ~ sign will mark the user home folder as destination.
For additional details regarding Slurm, please refer to the official documentation.